こんにちは。
mukaiyachiです。
mukaiyachiです。
今回はAndroidアプリの開発で使用するRecyclerViewについて説明します。
RecyclerViewは少し凝ったレイアウトを作るときに便利です!
まずはRecyclerViewを画面に表示するぐらいのところまでやってみます!
ちなみにRecyclerViewとは主に以下のような特徴があります。
- ListViewやGridViewのようにアイテムをリストで表示するためのもの。
- ListViewなどよりも多くのオプションがあり拡張性が高い。
- レイアウトを変更したり、リッチな操作を行ったりできる。
- アニメーションを行うなどの機能が利用できる。
そのRecyclerViewを作るには最低4つの要素が必要です。
次に実装方法です!
|
1 2 3 4 |
dependencies { 〜〜 省略 〜〜 compile 'com.android.support:recyclerview-v7:25.1.1' } |
|
1 2 3 4 5 6 7 8 9 10 11 12 13 14 |
<<??xml version="1.0" encoding="utf-8"?> <RelativeLayout xmlns:android="http://schemas.android.com/apk/res/android" xmlns:tools="http://schemas.android.com/tools" android:id="@+id/activity_main" android:layout_width="match_parent" android:layout_height="match_parent" tools:context="jp.co.itcowork.recyclerviewdemo.MainActivity"> <android.support.v7.widget.RecyclerView android:id="@+id/main_recyclerView" android:layout_width="match_parent" android:layout_height="match_parent"/> </RelativeLayout> |
|
1 2 3 4 5 6 7 8 9 10 11 12 13 14 15 16 17 18 19 20 21 22 23 24 25 26 27 28 29 30 31 32 33 34 |
<<??xml version="1.0" encoding="utf-8"?> <LinearLayout xmlns:android="http://schemas.android.com/apk/res/android" android:layout_width="match_parent" android:layout_height="wrap_content" android:orientation="vertical"> <ImageView android:id="@+id/row_imageview" android:layout_width="match_parent" android:layout_height="wrap_content" android:adjustViewBounds="true" android:scaleType="centerCrop"/> <LinearLayout android:layout_width="match_parent" android:layout_height="match_parent" android:background="#FFFFE0" android:orientation="vertical"> <TextView android:textSize="15sp" android:id="@+id/title_textview" android:layout_width="match_parent" android:layout_height="wrap_content" android:textColor="#FF0000"/> <TextView android:textSize="15sp" android:id="@+id/content_textview" android:layout_width="match_parent" android:layout_height="wrap_content"/> </LinearLayout> </LinearLayout> |
RecyclerView.ViewHolderを継承したクラスを作ります。
|
1 2 3 4 5 6 7 8 9 10 11 12 13 |
public class DemoViewHolder extends RecyclerView.ViewHolder { public ImageView rowImageview; public TextView titleTextview; public TextView contentTextview; public DemoViewHolder(View itemView) { super(itemView); rowImageview = (ImageView) itemView.findViewById(R.id.row_imageview); titleTextview = (TextView) itemView.findViewById(R.id.title_textview); contentTextview = (TextView) itemView.findViewById(R.id.content_textview); } } |
|
1 2 3 4 5 6 7 8 9 10 11 12 13 14 15 16 17 18 19 20 21 22 23 24 25 26 27 28 29 30 31 32 33 34 35 |
public class DemoAdapter extends RecyclerView.Adapter<RecyclerView.ViewHolder> { @Override public RecyclerView.ViewHolder onCreateViewHolder(ViewGroup parent, int viewType) { View itemView = LayoutInflater.from(parent.getContext()).inflate(R.layout.main_recycler_row, parent, false); DemoViewHolder demoViewHolder = new DemoViewHolder(itemView); return demoViewHolder; } @Override public void onBindViewHolder(RecyclerView.ViewHolder holder, int position) { if (holder instanceof DemoViewHolder) { DemoViewHolder demoViewHolder = (DemoViewHolder) holder; demoViewHolder.rowImageview.setImageResource(imageList[position]); demoViewHolder.titleTextview.setText(titleList[position]); demoViewHolder.contentTextview.setText(contentList[position]); } } @Override public int getItemCount() { if (titleList == null) { return 0; } if (titleList.length == 0) { return 1; } return titleList.length; } 〜〜 省略 〜〜 } |
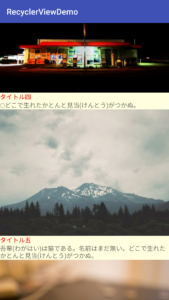
リストに表示するデータは、例として以下のようなものにします。
一つのセルに画像、タイトル、内容をそれぞれ表示します。
|
1 2 3 4 5 6 7 8 9 10 11 12 13 14 15 16 17 18 19 |
int[] imageList = { R.drawable.two, R.drawable.one, R.drawable.three, R.drawable.four, R.drawable.five, R.drawable.six, R.drawable.seven, R.drawable.eight, R.drawable.nine, R.drawable.ten }; String[] titleList = {"タイトル一","タイトル二","タイトル三","タイトル四","タイトル五","タイトル六","タイトル七","タイトル八","タイトル九","タイトル十"}; String[] contentList = { "◯吾輩(わがはい)は猫である。", "吾輩(わがはい)は猫である。名前はまだ無い。どこで生れたかとんと見当(けんとう)がつかぬ。", "吾輩(わがはい)は猫である。名前はまだ無い。どこで生れたかとんと見当(けんとう)がつかぬ。何でも薄暗いじめじめした所でニャーニャー泣いていた事だけは記憶している。", "◯どこで生れたかとんと見当(けんとう)がつかぬ。", "吾輩(わがはい)は猫である。名前はまだ無い。どこで生れたかとんと見当(けんとう)がつかぬ。", "吾輩(わがはい)は猫である。名前はまだ無い。どこで生れたかとんと見当(けんとう)がつかぬ。何でも薄暗いじめじめした所でニャーニャー泣いていた事だけは記憶している。", "◯何でも薄暗いじめじめした所でニャーニャー泣いていた事だけは記憶している。", "吾輩(わがはい)は猫である。名前はまだ無い。どこで生れたかとんと見当(けんとう)がつかぬ。", "吾輩(わがはい)は猫である。名前はまだ無い。どこで生れたかとんと見当(けんとう)がつかぬ。何でも薄暗いじめじめした所でニャーニャー泣いていた事だけは記憶している。", "吾輩はここで始めて人間というものを見た。", }; |
いくつか種類がありますが今回は LinearLayoutManagerを設定。
Javaのプログラムでも設定できますし、こんな感じでレイアウトでもできます。
(2のレイアウトに5行目と12行目を追加)
|
1 2 3 4 5 6 7 8 9 10 11 12 13 14 15 16 |
<<??xml version="1.0" encoding="utf-8"?> <RelativeLayout xmlns:android="http://schemas.android.com/apk/res/android" xmlns:tools="http://schemas.android.com/tools" xmlns:app="http://schemas.android.com/apk/res-auto" android:id="@+id/activity_main" android:layout_width="match_parent" android:layout_height="match_parent" tools:context="jp.co.itcowork.recyclerviewdemo.MainActivity"> <android.support.v7.widget.RecyclerView app:layoutManager="LinearLayoutManager" android:id="@+id/main_recyclerView" android:layout_width="match_parent" android:layout_height="match_parent"/> </RelativeLayout> |
Adapterは5で作成したDemoAdapterを設定します。
最終的にRecyclerViewを表示するActivityはこのような形になります。
|
1 2 3 4 5 6 7 8 9 10 11 12 13 14 15 16 17 18 19 20 21 22 23 24 25 26 |
public class MainActivity extends AppCompatActivity { @Override protected void onCreate(Bundle savedInstanceState) { super.onCreate(savedInstanceState); setContentView(R.layout.activity_main); // RecyclerViewを作成 createRecyclerView(); } /** * RecyclerViewを作成 */ private void createRecyclerView() { RecyclerView recyclerView = (RecyclerView) findViewById(R.id.main_recyclerView); recyclerView.setHasFixedSize(true); // LayoutManagerを設定 LinearLayoutManager layoutManager = new LinearLayoutManager(this); recyclerView.setLayoutManager(layoutManager); // Adapterを設定 DemoAdapter demoAdapter = new DemoAdapter(); recyclerView.setAdapter(demoAdapter); } } |
実行してみると下の画像のようなリストが表示されます。

今回はここまでになります。
